Why:
I recently moved to a new house and have been struggling to set up our wireless to provide an even amount of wifi coverage to each area with the three devices I have (2 Airport Extremes, 1 Airport Express). I also recently started to dig back into the Arduino stuff now that I’m in the new house and finally have a dedicated space to lay out everything. This seemed to be fate – I had a problem to solve and needed a project at the same time. Below I’ll walk through the learning process and include the final project details.
Equipment used:
Adafruit ATWINC1500 Wifi Breakout Board
10k Ohm Breadboard Potentiometer
Common Cathode RGB LED Breakout Board
The Hardware Setup:
I first started out getting the wifi chip up and running using Adafruit’s excellent tutorial linked from their product page. Once everything was wired up, I installed the Wifi101 library found on GitHub in this Zip file of their master branch.
My Wifi Wiring:
- ATWIN1500 ==> Arduino Uno R3
- VIN ==> 5v
- GND ==> Ground
- SCK ==> D13
- MISO ==> D12
- MOSI ==> D11
- CS ==> D10
- EN ==> 5v
- IRQ ==> D9
- RST ==> D8
- WAKE ==> Not Used
- CFG ==> Not Used
- RXTD ==> Not Used
- TXD ==> Not Used
Next was opening up the Arduino IDE and loading up the CheckWiFi101FirmwareVersion sketch as instructed by Adafruit, making sure to set:
WiFi.setPins(8,7,4);
in void setup().
My firmware was 19.4.4 so I needed to update, which I did following these handy instructions. Great! I was now ready to go.
Having wired, installed and updated everything, I was able to start scanning for wifi, which could not be easier with the built-in examples in the WIFI101 library. I first ran the ScanNetworks sketch and then the ConnectWithWPA sketch. Both worked flawlessly and allowed me to see available networks and even connect to a website and download the page into the serial monitor. Web scraper anyone?
Next, start to customize the code to remove the need for the serial monitor so I don’t have to carry my laptop around with my setup. That means adding a LCD. Luckily I have a few of these on hand.
My 16×20 LCD Wiring:
- SunFounder LCD1602 ==> Arduino Uno R3
- VSS ==> Ground
- CDD ==> 5v
- V0 ==> 10k Potentiometer Wiper (center)
- RS ==> D2
- R/W ==> Ground
- E ==> D3
- D4 ==> Arduino D4
- D5 ==> Arduino D5
- D6 ==> Arduino D6
- D7 ==> Arduino D7
- A (LED Anode) ==> 220Ω ==> 5v (22.73mA)
- K (LED GND) ==> Ground
LCD added, let’s add some code to make it work!
First, include the library at the top of the sketch:
#include <LiquidCrystal.h>
Then declare the pins you’re using for the LCD in the top of our sketch. In our case, we just need to declare the RS, E and Com pins like this:
LiquidCrystal lcd(2, 3, 4, 5, 6, 7);
The LCD setup is done and ready for instructions. But first lets also add a RGB LED so that we can also have an obvious visual indicator for when we’re making adjustments to the wifi from across the room, etc.
My Common Cathode LED Wiring:
- LED Breakout ==> Arduino Uno R3
- – ==> Ground
- R ==> A5
- G ==> A4
- B ==> A3

The Code:
That’s it for hardware, let’s move on to the code, which is a mashup of lot’s of other tutorials, but really quite simple!
#include <LiquidCrystal.h> // needed to power the lcd screen
#include <SPI.h> // needed to communicate will everything
#include <WiFi101.h> // need to run the wifi chip


char ssid[] = "YOUR-WIFI-SSID-HERE"; // your network SSID (name)
char pass[] = "YOUR-WIFI-PASSWORD-HERE"; // your network password

int status = WL_IDLE_STATUS;
WiFiServer server(80);

LiquidCrystal lcd(2, 3, 4, 5, 6, 7); // set the pins used for the LCD(RS, E, Coms)

const int redPin = A5; // pin used for red pin of LED
const int greenPin = A4; // pin used for green pin of LED
const int bluePin = A3; // pin used for blue pin of LED

void setup() {
 // set up the LCD's number of columns and rows:
 lcd.begin(16, 2);

 pinMode(redPin, OUTPUT); // set A5 to output
 pinMode(greenPin, OUTPUT); // set A4 to output
 pinMode(bluePin, OUTPUT); // set A3 to output

 // set pins used for Wifi chip
 WiFi.setPins(10,9,8);

 // initialize serial and wait for port to open:
 Serial.begin(9600);

 // wait for serial port to connect. Needed for native USB port only
 while (!Serial) {
 ;
 }

 // check for the presence of the shield:
 if (WiFi.status() == WL_NO_SHIELD) {
 Serial.println("No wifi shield not present");
 // don't continue:
 while (true);
 }

 // attempt to connect to WiFi network:
 while (status != WL_CONNECTED) {
 lcd.setCursor(0,0); // set cursor to top/left most spot on the lcd
 lcd.print("Connecting to:"); // write message to lcd
 lcd.setCursor(0,1); // set cursor to bottom/left most spot on the lcd
 lcd.print(ssid); // write the name of your wifi network to lcd

 // Connect to WPA/WPA2 network. Change this line if using open or WEP network:
 status = WiFi.begin(ssid, pass);

 // wait 10 seconds for connection:
 delay(10000);
 }
 server.begin();
}

void loop() {

 long rssi = WiFi.RSSI(); // sets signal strenth to variable rssi

 lcd.setCursor(4,0); // Set cursor to 5th spot on the top row
 lcd.print("Signal:"); // print message to lcd

 // in a loop, check the stregth of the signal and print it to the lcd
 // turn make the LED a corrosponding color

 // if strength is more than -50 it's excellent
 if (rssi > -50) {
 lcd.clear();
 lcd.setCursor(1,0);
 lcd.print("SGL: Excellent");
 color(0,255, 0); // green

 // or if strength is between -50 and -59 it's good
 } else if (rssi <= -50 && rssi >= -59) {
 lcd.clear();
 lcd.setCursor(4,0);
 lcd.print("SGL: Good");
 color(0, 0, 255); // blue

 // or if strength is between -60 and -69 it's fair
 } else if (rssi <= -60 && rssi >= -69) {
 lcd.clear();
 lcd.setCursor(4,0);
 lcd.print("SGL: Fair");
 color(237,109,0); // yellow-ish

 // or if strength is or less than -70 it's fair
 } else if (rssi <= -70) {
 lcd.clear();
 lcd.setCursor(4,0);
 lcd.print("SGL: Poor");
 color(255, 0, 0); // red
 }

 // print the acronym for decibel-milliwatts (dBm)
 lcd.setCursor(4, 1);
 lcd.print(rssi);
 lcd.setCursor(8, 1);
 lcd.print("dBm");
 delay(1000);

}

// color function which tells the pins how to behave
void color (unsigned char red, unsigned char green, unsigned char blue) {
 digitalWrite(redPin, red);
 digitalWrite(bluePin, blue);
 digitalWrite(greenPin, green);
}
That’s it! Add your wifi ssid and password to:
char ssid[] = "YOUR-WIFI-SSID-HERE"; // your network SSID (name)
char pass[] = "YOUR-WIFI-PASSWORD-HERE"; // your network password
(This is not secure, so don’t upload that to github without removing or obfuscating it)
Now go scan your house, garage, backyard, office, whatever!
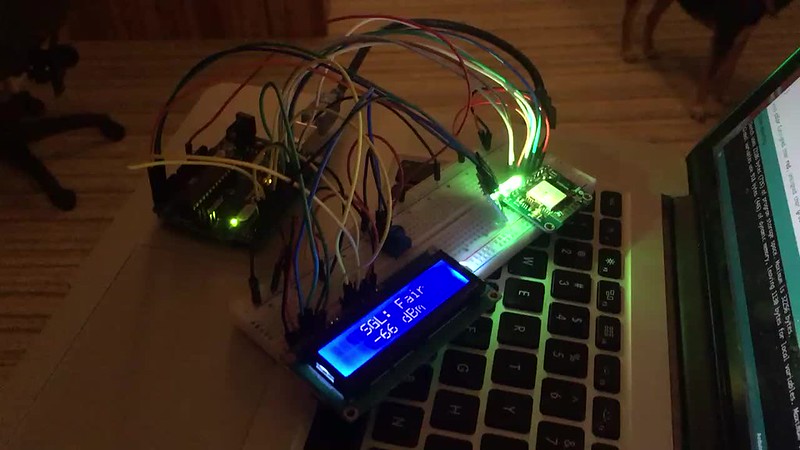
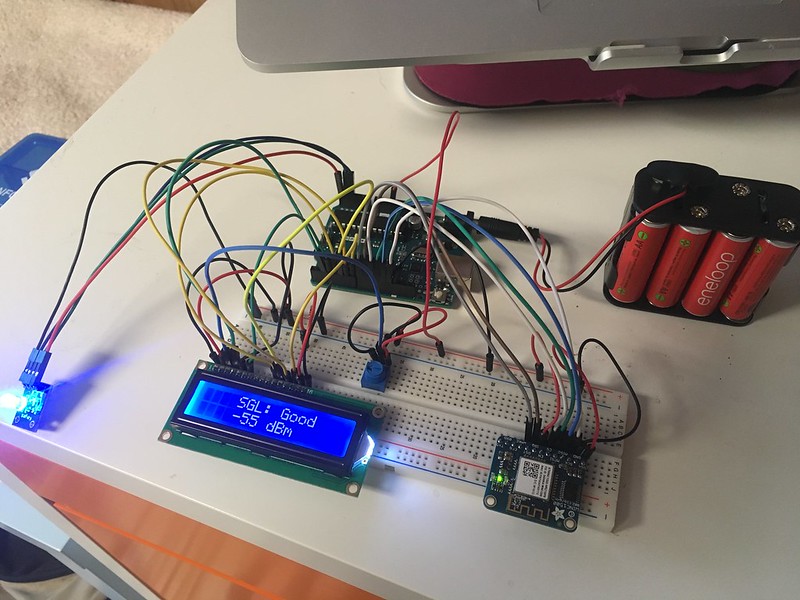
Early prototype testing: